Gathering with a Serger

Blogger: Alina Weeber
Gathering with a Serger
While I’m all about a nice and clean finish, I can also be quite impatient at times. Therefore, saving sewing methods are the best. Today you'll learn how to gather with a serger. I mainly use this technique on knits (for wovens I prefer the traditional way of gathering with a sewing machine). Because of that, I'll use the Magnolia pattern which is also a perfect fall staple! To give it a fun twist we are going to add an extra tier. But before we get started, here's some important know-how about your serger…
How is it even possible to gather with a serger?
Sergers have a feature called differential feed. It controls the movement of both the front and rear feed dogs and can have them move at different speeds.
- When set at 1 the feed dogs move at the exact same speed, transporting as much fabric towards the needles as away from them.

- When set at less than 1, the front feed dogs move slower than the rear feed dogs. Less fabric is transported towards the needles than away from them. The fabric will get stretched. (This can be used to produce a lettuce hem, for example.)

- When set at more than 1, the front feed dogs move faster than the rear feed dogs. More fabric is transported towards the needles than away from them. The fabric will get gathered. This is exactly what we need today!

How to get the right amount of gathering
Usually it doesn’t suffice to set the differential feed at the highest number to get the amount of gathering needed. You also have to increase the thread tension of your left needle. The higher your thread tension, the more your fabric will be gathered. How high it needs to be depends on how thick your fabric is and how much you need to gather it. Over time you´ll get a pretty good feel for it.
Until then, determine the right settings by trial and error on some smaller pieces of fabric.
The Magnolia skirt is twice as wide as the bodice. Hence we are going to cut several strips of our main fabric with a width of 20” (50.5 cm). Our goal will be to gather them to 10” (25.5 cm). (Note: It works with the same numbers for both the imperial and metric system, the important thing is that they are a multiple of 10.)

Now, set your differential feed and thread tension as high as possible. Sew along the 20” (50.5 cm) edge of one strip of fabric leaving a good amount of loose thread at the beginning and end. The longer the loose thread, the more you will be able to adjust the amount of gathering if needed. It can actually be quite a bit longer than in the following picture.

Measure the gathered section.
- Is it too long? Pull at the needle threads and gather some more

- Is it too short? Lower your thread tension and try on a new strip of fabric. Repeat until the desired result is achieved. In the following pictures the tension is lowered by 1 each time before giving it another try.

- Is it the correct length? Yay, you are almost good to go!

How to construct the extra tier
This part is really easy! To get the same amount of gathering as on the first tier, we are making our bottom tier twice as wide as the top one.
Take your GATHERED SKIRT pattern piece. Cut it at both the Top length skirt cut line and the Dress length skirt cut line. We only need the top (from here on referred to as tier A) and middle part (from here on referred to as tier B).

Extend tier B to the right making it twice as wide. I just used some coloured paper to do so.

Add a seam allowance to the bottom of tier A and the top of tier B. The picture shows it directly added to the fabric. You can either do that or add it to your paper pieces beforehand.

Sewing the Magnolia
Note: Be sure to always switch to the correct serger settings for either sewing to attach or gathering. Double check this! I´m speaking from experience, lol.
Now let´s get started!
Cut the bodice and sleeve pieces according to the tutorial.
Cut your tiers with the pattern pieces created in the previous steps. Tip: If the fabric is not wide enough for the bottom tier (tier B) can cut 4 pieces instead of 2 on the fold.
Construct the bodice according to the tutorial. When using the serger, make sure to cut off enough seam allowance to get the 1/2” (1.3 cm) seam allowance right! Before attaching the sleeves, iron the main seam allowance towards the front and the lining seam allowance towards the back. If following the directions for the seam allowance properly, every seam allowance will be nested nicely in the end.

Place the front and back pieces of both tier A and B right sides together. Sew to attach all four side seams.
Hem the bottom tier (B). Make sure the seam allowance faces towards the front on both sides.
Finally – the gathering part!
- Set the differential feed at the highest setting
- Adjust the thread tension
- Move theknife as close to the needles as possible (this is important so the gathering thread doesn’t show in the end)

Note: This will look different for different sergers)
- While gathering, make sure to cut off the exact same amount of fabric as on the other seams.

Sew all the way around the upper circumference of the top tier (A), gathering fabric along the way. Make sure the seam allowance faces towards the back on both sides. When the beginning is reached, let the fabric slide out from under the pressure foot and keep sewing until 4” (10cm) of loose thread is hanging from the fabric. Make sure not to pull on the fabric. The gathers will automatically be evenly distributed! Repeat for the bottom tier (B). Remember the seam allowance faces towards the front here.

You made it through the tricky part! Now don´t forget to
- set the differential feed back to your usual setting
- adjust the thread tension back to normal
- move the knife to its standard position (further away from the needles)
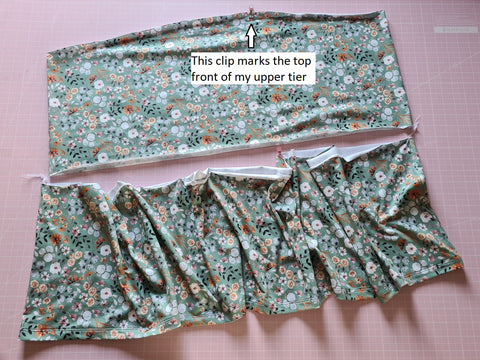
Pin or clip the top tier to the bodice making sure the side seams are nested nicely.

Pay attention to where the front and back are, especially on the top tier. Sew to attach, carefully running the fabric as close to the knife as possible. The gathered skirt is on top so keep the gathers straight and adjust them if needed. Make sure the left needle hits to the left of the previously sewn gathers.

Repeat the previous steps and attach your bottom tier to the top tier.
Congratulations, your tiered Magnolia is finished!


Tip: Play around with the tiers. Instead of using the top and dress length, why not use dress and maxi length to make a tiered maxi? Or take all three of them and make it three tiered. Or simply add a short ruffle to one of the skirts for a cute spin on the pattern.
Happy gathering! Alina