Tutorial: Making a Colorblock Bikini

Blogger: Kellie Lindgren
Making a Colorblock Bikini
Makena is a knockout of a swim pattern. It fits perfectly, accentuates all the right places, and offers amazing support. Find the Makena pattern here.
After making a few suits according to the pattern, good old facebook ads, knowing I was on a swim kick, showed me an ad for adorable, colorblocked style striped swim bottoms. It took me no time at all to get them made and ready for some summer swimming fun.
In this blog, I will show you how easily you can achieve this same, trendy colorblocked look.
To begin, you need the solid, un-ruched, Makena swim bottom pattern pieces cut out and graded (if necessary) to your size. Start by deciding how many stripes are needed, how thick they should be, and where they should be placed. This is where you can get really creative and have fun with it. It can be helpful to draw them onto your pattern piece.
Next, measure the longest length and width of the front and back pattern pieces. For my Size 18, I added 1 ¼” for height, so this factors into my measurements. From here, I like to add a few inches to both my length and width measurements to give myself wiggle room when cutting out my bottoms. After adding my extra inches, I end up with a measurement of 22” x 20” for the front and back pieces. This is my block size, and I will need two of them to complete the bottoms.
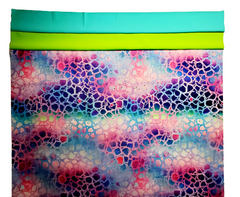
Now, is where we use our stripe patterns we decided on in the first step. I want two stripes, on the top of my bottoms, that are both 2” wide, and then the rest of the bottoms to be in my main fabric. I subtract 4” from the total length to determine that the rest of the length for the bottom portion is 18”.
Each stripe needs 3/8” seam allowance added to both the top and bottom of the piece. This makes the stripes the correct length after being sewn. So, both of the 2” stripes will need to be 2 ¾”. Cut out 2 stripes, one for the front and one for the back; do this for every stripe that you want to add to the suit.
After doing this math, I need the following:
1. Two pieces cut to 2 ¾”x 22” in the solid #1 fabric
2. Two pieces cut to 2 ¾” x 22” in the solid #2 fabric
3. Two pieces cut to 18” x 22” from the main printed fabric.

It is time to sew the stripes together. I like to use a long, straight stitch instead of a serger for this step, to reduce bulk and make a nice, flat garment. Sew stripe 1 to stripe 2, right sides together, horizontally. Then place the main print right side up, and the stripes just sewn right side down with stripe 2 aligned to the top and sew. This needs to be repeated so that a total of two blocks are being created.

All that is left now, is to cut out the pattern. Align the top of the pattern pieces with the top of the blocks when cutting. This ensures that the stripes will line up nicely when sewn.

From here, just follow the steps as written in the Makena pattern. Make sure to line up the stripes nicely when the front and back are being sewn together for a professional, even look.

I hope you enjoy your fun, coloblocked Makena bikini bottoms, please share any that you make on the Styla Facebook page!
Happy Sewing!

Fabric Source: The Styled Magnolia