Color Blocking Sausalito

Blogger: Lacresha Lincoln
Color Blocking Sausalito
Have you ever bought a mystery box from one of your favorite fabric companies? They are great fun to buy, because you never know what you will receive. Generally, the fabrics I receive from mystery boxes are 1 yard or less, which was the case when I received this beautiful, Cotton Lycra named Helix that is rich in color with a very soft touch from The Styled Magnolia Custom Fabrics.
When I sew, I think about the complete outfit I can make with this fabric, and generally, just one yard of fabric is not enough. One way I make my premium fabrics go further is to use a simple sewing method called color blocking. Color blocking is when two or more contrasting or complementary fabric pieces are sewn together to create a finished garment.

Most patterns can be color blocked, but beginner-level sewists should use beginner-friendly patterns such as LLK Sausalito or New Haven. These patterns have very few pieces and can be sewn up quickly. With Sausalito as my example, I'll show you the basics of color blocking.

-
Print your Sausalito pattern and cut out each of the pattern pieces. I will use the following components in this example: sweater front, sweater back, and long sleeve. Please place aside your neckband, sleeve cuff, and hem band pattern pieces, as they will be needed later during our sweater assembly.

-
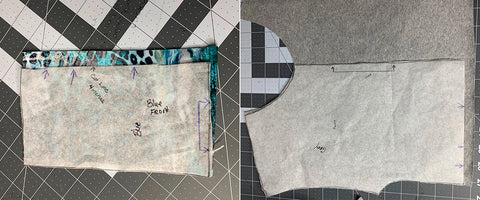
Now take the sweater front pattern piece, and starting from the bottom of the pattern measure up 4 inches. Please note you can use any measurement. Draw a straight line across the width of the pattern. Now using your line as a guide, cut the pattern piece.

-
We now have two front sweater pattern pieces. Mark both pattern pieces along the cut. Add 1/2" to o this marked cut line on both pieces to account for the seam allowance. You can redraw and recut these pattern pieces by adding the seam allowance or marking your original pattern pieces to cut ½ inch away from the cut line.
-
Now it is time to use the pattern to cut your fabric. The original pattern instructs you to cut on the fold, so each pattern piece will also need to be cut on the fold. Cut the selected fabrics for the project using the new pattern pieces.
-
With right sides together, sew using ½ seam allowance. Press seam down. The front sweater is now assembled.
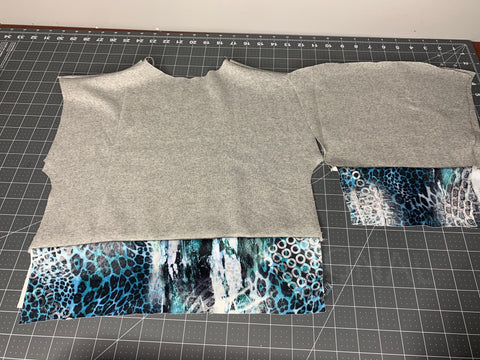
- Please repeat steps 1-5 for the sleeve and back sweater.
Once each piece has been assembled, follow the directions in the tutorial of the Sausalito Pattern. Please note in the example above that we made one cut, but you can make any number of cuts; be sure to add your seam allowance to both sides of each cut. This example is just a starting point, so be creative, and I will love to see what you make!!!
