Creating a Fabric Print from an Embroidery Pattern using Fabric Paint

Blogger: Christine Hanes
Creating A Fabric Print from an Embroidery Pattern Using Fabric Paint
Here are the materials you will need:
- your choice of sewing and embroidery patterns
- fabric - solids or minimal patterns work best so the paint can be seen
- fabric paint
- craft foam sheets to create the stamp
- a block to use for the stamp. I used a wood box I had on hand, but a scrap of wood or an acrylic block also works well!
- glue gun (low temp is best for craft foam)
- scissors or an Exacto knife
- marking tool (pencil, pen, fabric marker)
- plate or flat tray for paint. Choose something disposable for easy clean up!
- foam paint brush (optional)
- scrap paper, tablecloth, or something to cover the workspace (optional)
Pre-made stamps may also be used, or create your own shapes to paint your fabric however you wish.

To get started, I like to get my fabric pattern pieces cut and ready to go. Make sure the pieces are ironed well before stamping with fabric paint, so it can be applied smoothly. Stamp as many or as few pattern pieces as you like. For this example, I am using the Katy dress pattern and Seaside embroidery pattern and will be stamping on my bodice and skirt fabric, where my embroidery will be done.
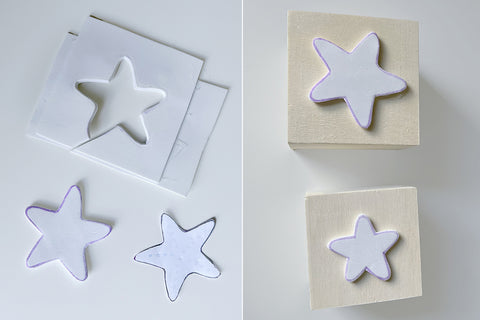
First we need to prepare the stamp. If you are using regular craft foam (2mm or 3mm - what is found in most stores), I like to glue two sheets together to give the stamp a little more clearance from the block. This helps minimize paint getting on the block, and then transferring to the fabric where you do not want it. Try to apply the glue evenly, or use a scrap of cardstock to smooth it out, so the stamp is flat. If a thicker foam is used, you are already good to go! Cut out the embroidery design, or shape you will use, and then trace it onto your piece of foam.

Next, cut out the design you transferred to the foam and glue it to the stamp block using a low temp glue gun, or by allowing the glue to cool for a moment if using a hot temperature. I am using wood for my block in this example, but if you are planning to stamp your fabric to embroider on top of it, I suggest using a clear block so you can see the outline of your embroidery design to know exactly where you are stamping. Now your stamp is ready to go!
Some key info about using fabric paint: It is important to follow the instructions on your fabric paint. The paint will determine which fabric content you need (cotton, polyester, etc). Some require heat setting once the paint has dried, others do not. Be aware that the paint may seep through your fabric, so make sure you are only stamping on one layer of fabric at a time. Having your work space covered helps reduce the cleanup. Always test your paint on a scrap of fabric first, both to make sure it works for your fabric and to make sure you like how it looks! Some paints dry lighter or darker, and some paints are more translucent or opaque than others. You may have to play around with different combinations to get the look want. Also keep in mind that fabric paint is permanent on fabric! So be careful about what clothing you or your child are wearing while painting.

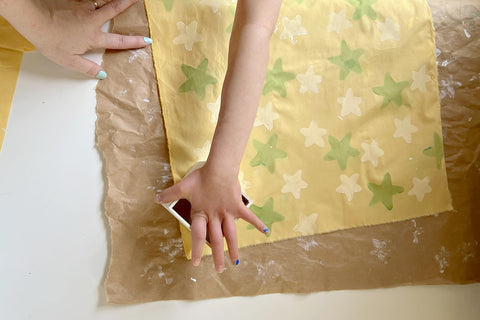
This is where little hands might like to join! Cover your surface, if it is not washable. Get a scrap of the same fabric you intend to use for your project, so you can see how it takes the paint and make adjustments if needed. You can either apply the paint to the stamp with a foam brush, or add a layer of paint to a plate (not too thick, you want a thinner layer than the depth of your stamp) so you can place the stamp directly into the paint. If you have little ones helping, this is a great opportunity for them to get some practice using the stamp (and get some stamping excitement out!) so they understand what to do before starting on the final outfit.

Now it’s time to stamp! Lay your fabric out on a flat surface and start stamping! There are no rules with creating your own painted fabric, just have fun and let your creativity flow! If your paint is more translucent than you would like, you can add multiple layers to the same spot. It helps to allow the paint to dry between layers. You can also add to your design by allowing the paint to dry, then adding additional layers around where you have stamped, overlapping, changing colors, or changing stamps. I decided to use two colors for this dress, and two different sized star stamps to correlate with the embroidery pattern. After my white was completely dry, we went back and added another layer of stars in another color.

To add some variation to the bodice embroidery, I traced the Seaside embroidery design on with a fabric marker, then used my stamps with the same design to fill in the pattern. The stamps are not perfectly aligned with the embroidery pattern (it would help to use a clear block to achieve a better alignment), but they will still add a fun pop behind my embroidery.

Once all your fabric is stamped, allow it to dry. Heat set if necessary. Your fabric stamping is complete! If you plan to embroider on top of any of your painted pieces, you can proceed as you normally would.

Sew your outfit as normal according to the pattern! You will have your own completely customized outfit. If you had little ones helping, they can take such pride in knowing they helped make the fabric for their outfit!


