Tutorial: Adding Belt Loops to the Newport Shorts

A fun addition to the Newport Shorts is to add belt loops and a fabric sash, creating a whole new look. When making the Newport Shorts, follow the steps as instructed up to Constructing the Waistband in the pattern. Follow these additional steps to add the belt loops to the waistband front and back before the first step in this section:
Creating the Belt Loops
Cut a strip of fabric 2’’ wide by 11’’ long. The length of this strip is suitable for all sizes.

Fold the piece of fabric in half, aligning the long raw edges, wrong sides together. Press to make a crease.

Open the fold and bring the long raw edges in to meet the center crease. Press.

Fold in half again, bringing the long folded edges together and press. The piece is now 1/4 its original size. Topstitch the long folded edge, using a 1/8’’ seam allowance, to secure it closed.

Topstitch the remaining long edge using a 1/8’’ seam allowance.

Cut the fabric into 3 pieces, matching the height of the waistband size being sewn. For example, size 3 will be 2 3/4’’.

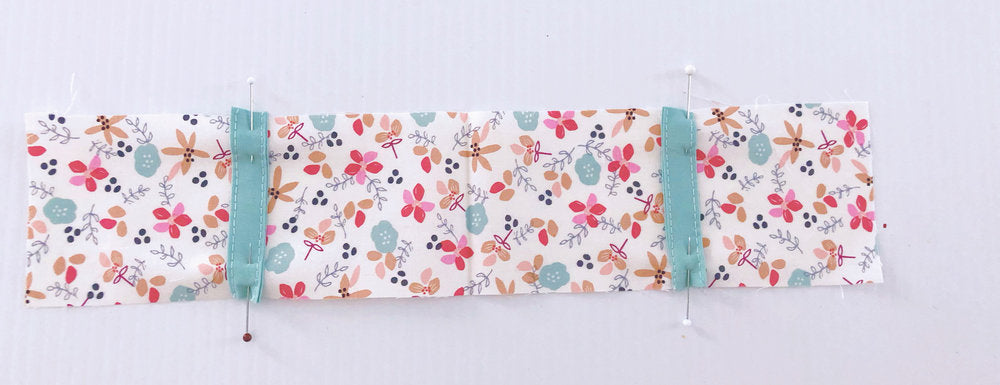
Find the center of the back waistband by folding it in half. Press to create a memory crease. Place one belt loop over the center position with the wrong side of the belt loop touching the right side of the waistband. Pin in place. Using a 1/8’’ seam allowance, baste in place at the top, and bottom of the fabric.

Find the center of the front waistband by folding in half right sides together. Press to create a memory crease.

Fold the waistband in half again. Press to create another memory crease.

Unfold the waistband. Place the belt loops over the crease created on each side of the center crease. The wrong side of the belt loop will be touching the right side of the front waistband. Using a 1/8’’ seam allowance, baste in place at the top, and bottom of the fabric.
Continue with the instructions for Constructing the Waistband per the pattern.
Constructing the Sash
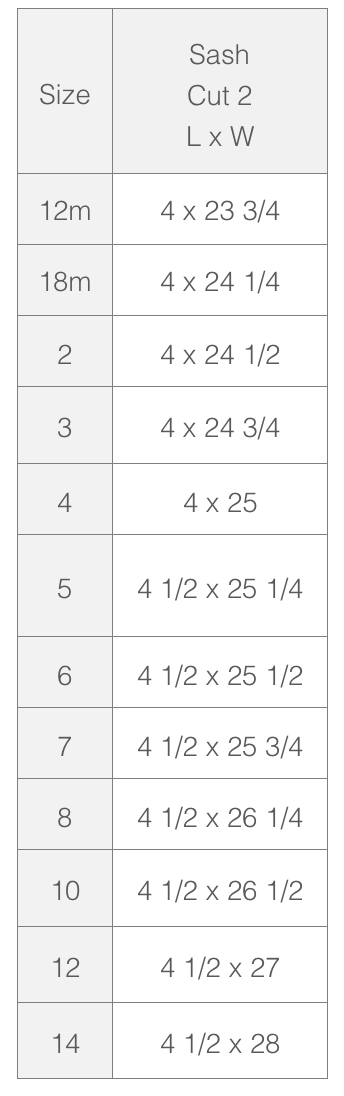
Cut 2 pieces of fabric according to the chart below.
Place the two pieces right sides together and sew one short end with a 1/2’’ seam allowance.

Press the seam open.

Fold the fabric in half, right sides together. Press.

Trim the edge of each end of the fabric at a 45 degree angle.

Sew around the raw edges of the sash with a 1/4’’ seam allowance. Leave a 2” opening in the middle for turning.

Clip the corners.

Turn the sash right side out using a turning tool of your choice. Press.

Pin the 2” opening closed. Topstitch around the sash to close the 2” gap.